In the real world, a tiny, shipper-owned industrial railroad like Frazier Borate wouldn't be likely to have passenger stations -- or passengers, for that matter. But let's assume that Lockwood & San Emigdio passenger trains stop at Amargosa, so some accommodation is needed. Thus, Amargosa gets a little flagstop.
I had originally planned to use a laser-cut wood kit, possibly a little flagstop from American Model Builders, which I also have in HO -- a fun "connection" between the On30 L&SE and the HO Bakersfield & Ventura. But I'm on this cardstock building kick, so at least for now it's the Clever Models Flagstop.
 |
| Finished, at least for now. I will add a bench or two and some other details on the platform, and may do some additional weathering. |
Build Notes:
 |
| The first night's work -- a couple of hours cutting out and framing windows. Next I'll cut and apply all the green trim, cut and glaze window sashes and the door, and make the interior walls -- that's two or three more evenings of work before I'm ready to fold and glue the walls into a box. |
One shortcoming of cardstock models is that it's difficult to change colors. I normally paint stations in what, to me at least, is a typical southwestern scheme of yellow-tan walls and red-brown trim. This white and green color scheme seems more New England to me. I've recently started playing around with modifying the Clever Models PDFs in Inkscape, a public domain vector graphics program. It's probably possible to change colors in Inkscape, or maybe in its raster graphics cousin, GIMP. If I can figure that out, I'll just build another station, and assign this one to Christmas train duty.
 |
| Day 2: Door and window frames installed, door in place, trim installed. |
 |
Beginning of the interior. The interior wall material -- pale yellow over brown wainscotting -- is from a Clever Models "Interior Details" texture sheet. I added 1/8 square balsa at top, bottom, and corners, colored with a brown marker. I used an extra door frame, colored brown with the same marker, on the inside, and will do the same with the windows.
|
Day 3: Added window sashes and made the back wall, floor and ceiling, and some interior details. The interior is all cardstock except the stovepipe, which is a small dowel. I'm going to print and add some wall details: a clock, a calendar, map, and a travel poster or two.
 |
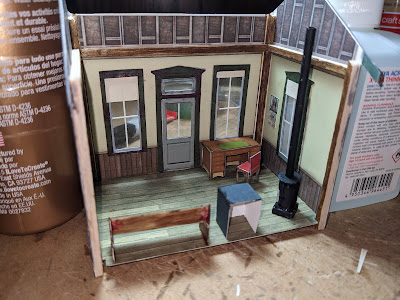
| I found the desk on a paper dollhouse site. The chair is from a Clever Models freebie detail sheet. The bench and stove are scratch built from cardstock. |
Day 4: More interior details. I gathered images from various places, imported them into Inkscape, sized them, in some cases made some modifications, then printed the resulting page. For the safe, I found a photo of an antique safe and used that for the front; top and sides are black rectangles added in Inkscape. The clock is from a photo. The vintage map of Ventura County came from the Ventura County Historical Society web site; I added a frame and drew the route of the Bakersfield & Ventura in red in Inkscape. The travel poster was also found online.
 |
| The front corner is still bare. I may add another bench, or a couple of chairs. Did I say this was going to be a simple, straightforward build? |
This evening I also finished and glazed the windows and door, and I'm in the process of adding window mullions with Chartpak tape. Once that's done, I can assemble the walls and floor.
 |
| I used the kit window frames on the inside but colored them with a brown marker. The door and the window on the left have had mullions added. The others still need to be done. |
 |
| Extra interior details here include the schedule board on the left (from the Clever Models "Station Details" sheet from the Jackson 2 Collection) and a 1930s Santa Fe railroad calendar I found online, on the right side next to the agent's desk. |
Day 5: I put in a lot of hours today.
I decided to add lighting to the interior, so I punched a hole through the ceiling and installed a "grain of rice" mini bulb -- I have a bunch of them I bought years ago, and figure I might as well use them. I was going to just run the wire down the wall, but then had the thought of using the stovepipe as a conduit. Only the stove pipe wasn't a pipe. So I removed the top and the stovepipe from the stove and started rummaging for a piece of suitable size tubing.
I figured the ink reservoir tube from a ballpoint pen would be about the right size, so I looked though my desk drawer and found a dried out pen. Cleaned up and painted black, the ink tube was just the right size, actually better than the dowel I originally used. In the process of disassembling the pen, I noticed that the tapered bit of the barrel, down near the point, was shaped kind of like a lamp shade, so I cut that off, painted it green and glued it over the lightbulb.
 |
| A bit of a cheap ballpoint pen, painted green, was the right size and shape for a lampshade. |
 |
| The wires from the lightbulb will thread through the stovepipe at left and come out through the floor. |
I added Chartpak tape mullions to the rest of the windows, and short blinds -- I wanted the interior to be visible. I thought the upper walls, in the attic spaced, needed reinforcement, so I laminated a layer of Clever Models stud-and-plywood texture, because, why not? Touched up with paint here and there, and called it ready for assembly.
Glued up the walls and floor. Added the front roof-support brackets.
Day 6: started work on the roof. The kit comes with red, diamond-shaped shingles, and decided to stay with that, just for variety, since most of my other buildings have or will have corrugated metal, tarpaper, or wood shingle roofs. I have a Clever sheet of individual strips of diamond shingles and I'll probably apply those over the flat, printed version, but lordy, cutting them out is going to be a job. Added a layer of cracker box cardstock for strength and dimension, a layer of wood pattern on the underside, and a couple of triangular cardstock braces on the inside. The combination makes for a very sturdy roof. I plan to leave the roof and ceiling removable for now, since I want to add the station agent and a passenger or two inside, and I still need to buy those.

Next the shingles, then chimney, signboards on the ends, a platform, and a few other finishing touches. Looking at the photos, I think I need to mix some matching green paint and touch up the trim, especially at the corners. Maybe two or three more days/evenings of work?
I estimate 15 hours in so far, maybe 5 hours to go. That's a lot of entertainment out of a kit that cost me less than $5 for the PDF, plus a couple dollars more for paper and ink.
Day 7: Not a lot done today, with Christmas. I laminated a sheet of wood plank texture (Clever Models Roofing Underlayment) onto two layers of cracker box cardboard and cut it to fit the curved track where the station will be located. It will get some framing underneath. Cut and applied the first few strips of shingles. This is going to take a lot of time to complete, but I think the more detailed roof will be worth it. I used 65 pound stock for this and it seems too thick. I had tried using regular printer paper and that was too thin. I saw some 25 pound (or thereabouts) in the craft store, so maybe I'll try that in the future.
Day 8: Finished shingling the roof. Added the stripwood foundation/framing under the platform. Just about done.
I know I'm picking nits, but I'm annoyed that the shingles on the ridge cap don't quite line up. Compare these two photos:
 |
| Back side: The points of the diamond shingles on the ridge are aligned with the rows below. |
 |
| Front side: The points of the triangles don't quite line up with the rows below them. |
Okay, probably no one but me will notice, but still.... I looked at an American Model Builders HO station I have, that has diamond shingles, and it uses a solid ridge cap, perhaps representing metal flashing. I could tear off the ridge shingles here and replace them with a solid piece, or even start over and build a whole new roof. But I'm not sure it's worth the effort. Maybe for now I'll content myself with adding signs, doing some touch up painting, and call this one done for now. I can always come back to it later.
Day 9: Complete for now. I may do some additional weathering later, add add details on the platform and a couple of people inside. Total build time was probably upward of 20 hours.
One more picture, this one with the light on. As you can see, the light shines through the lighter colored parts of the walls, and especially at the corners where there is a gap in the inside wall material. This is using a grain of rice bulb rated at 14 volts, driven by a 12 volt power supply. Might be better with a lower voltage. I tried an old 5 volt phone charger and it's so dim it's barely visible. I'll see if I have a 9 volt supply on hand, or try wiring two bulbs in series, or add a resistor, and see what that does. Lesson learned: if I'm going to light a building, I probably need to paint the hidden side of one of the wall layers black or dark brown to block light leakage, or add a layer of heavier cardboard (chipboard or cereal box material).


Comments
Post a Comment