Situated in the tiny mining village of Amargosa, California, the Bitter Creek Brewery uses the mineral-rich waters of Amargosa Creek to produce a beer that's been described as astringent, yet strangely refreshing. Originally produced to slake the thirst of miners in the Frazier Mining District, it has found fans all over the world -- or at least, as far away as Bakersfield.
The Bitter Creek Brewery is my most recent cardstock building, based on the Clever Models Creeky Roofing kit. I like the building's combination of stone foundation, weathered clapboard walls, and shingled roof, and the false front with the center peak. Mostly importantly, it was just the right size for an empty lot on my On30 Frazier Borate Mining Co. mini-layout.
I added interest to the basic building with a water tank ("It's the Water," after all), a loading dock, and additional signage.
The Creeky Roofing kit includes two versions of the front wall, one with lettering and one without. I imported the blank wall into Inkscape to add the brewery lettering.
After putting together a few Clever buildings, I've come to prefer to use 110 pound cardstock for the outer (printed) walls, laminated to a second layer of either 110 pound card (if I'm printing an interior texture) or other cardstock, usually manila file folder material. I brace the walls generously with balsa at the corners and along the top and bottom.
 |
| Sitting on a temporary base. The annex on the left will house the brewery's retail and tasting room. I was going to do annexes on both sides, but there isn't enough room on the site. This view shows a little of the internal bracing.
|
I hated doing windows on my first couple of Clever kits, but I feel like I've gotten pretty good at them. I usually print them on 65-pound card, which is easier to cut cleanly; reinforce the cardboard by painting the back side with liquid ACC (Superglue) before cutting, and above all, always start with a fresh Xacto blade. Notice I did not attempt to cut the round window at the top of the front wall -- it's recessed, but the window "panes" are just the printed window, with a layer of shiny tape to make it look more reflective.
 |
| The barn-style door is from Clever Models' Juke's Boat Rental. |
I like carving foundations from scraps of EPS foam, which I use for building scenery. I print the Clever foundation pieces on plain paper using a black-and-white laser printer, cut them out, and glue them to the foam with rubber cement. I cut through the paper and into the foam with a sharp Xacto knife, following along the mortar lines, and peel the paper off as I go. Then I go back and carve more to add texture. You can see that somewhat in the pictures with the light green foundation.
 |
| I carved the foundation from EPS foam. |
Paint really makes the foundation. I use cheap craft store acrylics in black, gray, and ivory, mixing colors randomly with the brush for a lot of variation, then give it a wash of dilute black to accent the mortar lines, and finally a little dry-brushing with gray.
 |
| The building will sit on a slope, with the ground level even with the freight door on this side, sloping down to the bottom of the foundation in back. There will be a porch in front of the door on the left. It needs some signage. I wish now that I had added more "painted on" signs in Inkscape. |
 |
| It took three tries to get the angles right on the annex roof. |
 |
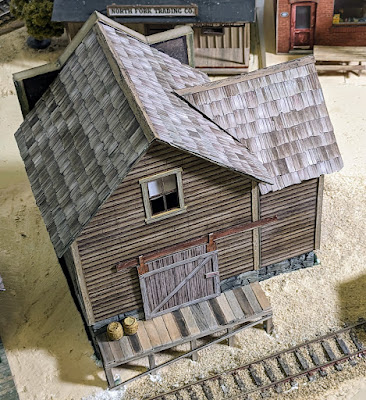
| I especially like this angle on the building, which is good, because this side will face the front side of the layout. There will be a loading dock even with the door. It also needs some advertising signs. Shingles near done on all but the back side of the annex. Like the walls, the roof is two layers of card (three if you count the shingles) and well-braced with balsa |
I cut individual strips of shingles, notched them along every printed line, then glued the strips on, overlapping them by about half. I pried up the edges of a few shingles here and there for extra texture.
Here's the building at this stage, test fitted on the layout. I traced around the foundation on the painted foam landscape, then cut an opening to fit. The foundation dropped right into that opening, and sits on a wood framing piece that happens to run right below the building.
 |
| There is room for a narrow loading dock on the track side. |
I added a loading dock made of 1/16" square stripwood and some coffee stirring sticks I brought home from work. I prestained the wood with dilute acrylics.
 |
| There's way too much contrast between the light and dark boards. I'll give it all a grey wash to even them out. |
It needed more signage. I found a vector image of a beer bottle online, imported it into Inkscape, and added the same Bitter Creek Brewery logo that I used on the front wall of the building, as well as the slogan "It's the Water" on the band around the neck. The lettering doesn't curve with the label like it should, but it's not too noticeable. I printed two copies, slightly different sizes, and glued them to the side walls.
 |
| I created a beer bottle sign for the side of the building. |
 |
| Gray wash on the loading dock to tone down the contrast. Less obvious, since the last set of pictures I also glazed the windows and painted interior walls and floors black. I don't intend to do an interior for this building, and the dark interior walls help disguise the lack of details. |
The brewery had to have a water tank. I printed the tank parts from the Clever Models Gorre Water Tower at a reduced size, and then cut them down still further to fit around a piece of PVC pipe.
And here it is installed. I build the tower framing from more 1/16" stripwood, stirring sticks and scrap.
Next, I built the chimney. Actually, I built two. I wasn't happy with the one that came with the kit (my build, more than the design), so I went looking through my files of leftover bits and pieces and found this fancier one. I think it was part of a freebie file of doors, windows and other station details, originally from the Small Town Depot kit. It adds a little gravitas to my humble brewery.
I made the office sign in Microsoft Word, printed it on card, and hung it. Added front steps and did some touch-up.
Finally, I glued the foundation into its hole in the scenery and added some ground cover.
 |
| Quality control. |
I have some 3D printed cases of beer bottles that I'll eventually get around to painting and stacking on the loading dock, ready for loading into a refrigerator car for delivery to those thirsty customers.


Comments
Post a Comment