After visiting the Durango & Silverton this summer, I decided I needed to build a little excursion train for the Lockwood & San Emigdio.
The story is that the L&SE was "discovered" by Hollywood in the 1930s. Being only about 70 miles from Hollywood, it made a convenient place to film train sequences for the movies, and the little Lockwood Valley towns and ranches made pretty good locations as well. The railroad made money from the movie work, of course, but also capitalized on the free publicity by sprucing up some old passenger cars and giving rides to tourists on the weekends. A Beer Train, which stopped for refreshments at the Bitter Creek Brewery, was especially popular after the repeal of prohibition.
I have a Bachmann 2-6-0 in the Rio Grande Bumblebee paint scheme, and eventually I plan to put together a train of Bachmann passenger cars to match, but for the Frazier Borate mini-layout I needed something smaller. So I bought a couple of shorty passenger car kits from Mount Blue Models, a combine and an open excursion car. They'll be pulled either by a 0-4-2 Porter or maybe an 0-4-0 with an added tender. That's likely the whole train. At most, I might add one more passenger car or perhaps a caboose.
My usual approach is to build subassemblies of things that are the same color, then paint everything before finishing assembly. That makes it easier to get good clean separation of colors on things like the letterboards and the belt rail.
The Mount Blue kits are made almost entirely of laser-cut wood with a cardboard roof for the combine, and some plastic detail parts. The wood is a combination of thin veneer-type plywood and basswood. Many of the parts have a peel-and-stick backing. Everything is intelligently laid out and cleanly cut.
 |
| These are most of the parts for the combine, with the exception of the roof. Most of it is very thin plywood with a peel-and-stick backing. |
I started with the open excursion car. I assembled the inner and outer walls and added the window and door frame trim, which will be painted the same color as the sides, but left off the letterboards and belt rails. Those will painted separately and applied to the sides afterward. I also built up the frame and floor, and assembled the neat little bench seats, which like those on the D&S, run longitudinally down the center of the car, facing outward. It's all pretty easy and the instructions are clear. You just have to pay attention and think things through.
A few notes on the floor and frame: Look for the small slots or grooves on one side of the frame. This is the bottom of the frame. Glue the floor to the other side, which is the top.
The smaller piece at the top of the photo is one of the truck bolsters, which will be glued across the frame, with the grooved side of the bolster facing the grooved side of the frame. The grooves align to form a tunnel through which your truss rods will run. Even though I was careful about getting the grooves lined up and not getting glue into that area, I found that this opening was too small for the truss rod material to pass through. I ended up reaming the hole out with a pin. You might want to enlarge the grooves slightly with a few swipes of a triangular file before assembly.
The instructions show the floor glued with the scribed side facing down toward the frame. You want to have the scribed side up, where it will show. The frame should be glued to the plain side of the floor.
Finally, the instructions say to glue the needle beams "inside the etches." The etches are hard to see, but they're there if you look in the right light. They're located about 15/16 of an inch from the bolsters.
Everything else is pretty clear so far. Here's a progress shot:
The instructions suggest gluing the sides and ends together at this point. Normally, the letterboards and belt rails would already be installed, but I figured those wouldn't be that hard to add later, so I went ahead and built the body.
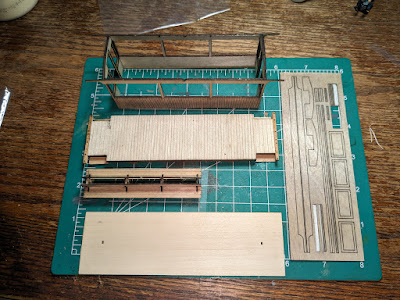 |
| This is just about everything. Sides and ends assembly at the top; floor and underframe; bench seat; and the roof. The sheet at right contains most of the remaining trim parts. |
Here's the wall assembly dry-fitted on the frame:
At that point, I turned my attention to the combine. The floor and the underframe are identical to the excursion car, and the basic body assembly is similar, so I won't describe that in detail. Here is the partially assembled combine:
I couldn't go any farther without painting, so time for a decision. After all my waffling over color schemes, I ended up painting the combine Pullman green. As much as anything, it was impatience: I still hadn't found the shade of yellow paint I wanted, and didn't have time to make the two-hour round trip to the nearest store that might have it. I had a bottle of Poly S Pullman Green, so there you go.
To make it a little more interesting, I painted the letter board and belt rail black, the window sashes and end doors brown (Poly S Earth), and the interior with the same brown.
After painting, I applied the letterboards and belt rails to the sides, and glazed and installed the windows and doors. I installed the Athearn trucks and Kadee 148 couplers. The coupler height is just about perfect, so I'll stick with the Athearn wheels, even though they look small.
Here it is on the layout with the main roof in place. The were a couple of roof rib parts (the instructions call them "carlines") that I almost missed -- they're not in the photo above, but you can see them in the next shot. Again, you have to read the instructions carefully, and it doesn't help that I'm building it somewhat out of order.
The center section of the roof where the clerestory will be can be removed -- just run an Xacto knife along the scribed lines and it comes right out. That's optional, but you can see down through the clerestory windows from some angles, so I think it's worth doing.
I deviated from the suggested kit construction order again from this point. I applied the supplied roofing -- precut strips of adhesive-backed paper -- and painted it grimy black. But it didn't have much character. So I cut some 1/2-inch squares of tissue paper from my wife's box of gift-wrapping supplies, and applied them over the kit's paper roofing, using grimy black paint as an adhesive and then painting more over the top. If there are some bubbles and other irregularities, that's a feature, not a bug. When the paint dried, I trimmed the edges, then ran a thin bead of ACC (Superglue) along the edges to seal them down. Then I glued the pre-painted clerestory sides into place.
I almost forgot to add the glazing to the clerestory windows before I put the center roof section in place. The instructions say to use "thick white glue." I'm not sure what they mean by that; I used Aleene's Tacky Glue, which is thick and white and does a good job joining dissimilar materials.
The center roof section is cardboard. I painted it on both sides and all the edges before installation to reduce the chance of warping, then used carpenter's glue along the top edges of the clerestory walls to glue it in place, and some ACC Gel to hold down the ends. When dry, I applied the stick-on roofing followed by painted tissue paper as before, and again ran a bead of ACC along the roof edges to seal them. Finally, I touched up the black paint.
This is what it looked like at that point.
I decaled the car for L&SE using a Microscale Extended Roman alphabet set. The color is called Dulux, a dark, kind of golden yellow that some railroads used instead of gold to letter heavyweight passenger cars. I'll use the same lettering on cars I paint in the yellow and black scheme to mimic the yellow-gold lettering on the D&S cars.
Here it is with end railings and brake wheels installed. Still needs some touch up paint and passengers, but it's pretty much done.
With that done, I turned my attention back to the excursion car.
I considered painting it in a Durango & Silverton style scheme, and I did get a bottle of Modelflex D&RGW Gold paint, which is a good match for the Bachmann locomotive. I gave the excursion car a coat of gray primer, but found the yellow-gold paint did not cover well -- the gray I used was too dark. I decided instead to paint the siding Tuscan Red (ModelMaster Light Tuscan, to be precise), with the rest of the paint scheme identical to the combine.
The rest of the assembly was similar to the combine, just simpler. I added a few passengers to the open car.
As it turns out, these cars are really petite compared to the Bachmann cars -- not just shorter in length, but also shorter in height, and narrower. The difference is so noticeable that, to me anyway, they just don't look right together. On the other hand, the Mount Blue cars are a perfect size for the little Frazier Borate layout and look great behind a Bachmann Porter. That being the case, I feel like it's just as well I didn't paint them in the Bumblebee scheme
The cars are quite light (though they seem to track okay). I'm thinking I might hide some weight under the bench seats, and in the baggage compartment of the combine.
I'm happy with the paint schemes as they worked out. Having two different color cars makes the train more interesting, while the matching trim and lettering gives them a family resemblance. And the Tuscan Red on the excursion car coordinates nicely with the maroon striping on the engine.


Comments
Post a Comment