The Next Day: My supply haul: A 4 x 8 sheet of 2-inch pink foam, a 2 x 4 foot sheet of 5mm underlayment, two tubes of adhesive and a tub of lightweight spackle. I cut the foam into smaller sections in the parking lot at Lowe's so I could get it in my car.
The festivities begin tomorrow morning.
Day 1 of the build:
Here's the first day's progress. There will be one more layer of 2 inch foam on the bottom, and at least another 2 inches added to the mesa on the right, probably 4 inches.
The first two layers above track level are pretty monotonous. As I worked upward, I got more aggressive with my carving and the results are better. I'll probably go back tomorrow and rework those two layers for more variety. I notched out layer 3 between the two buttes and I like that it breaks up the monotony. I may remove part of layer 2 on the left side, so the butte starts lower, which will make it look taller.
I mentioned carving. I started out doing deliberate carving on the bottom layers, but I pretty quickly discovered what works best is more of a chipping action -- insert a utility knife into the foam at different angles, and pry or twist to break away a chunk of foam. This looks more like broken rock. Then I used Dave Meeks' suggestion of using a small wire brush to add fine strata, brushing mostly horizontally. I found a steel brush was too aggressive, but a brass one was about right, followed by cleanup with a nylon bristle brush.
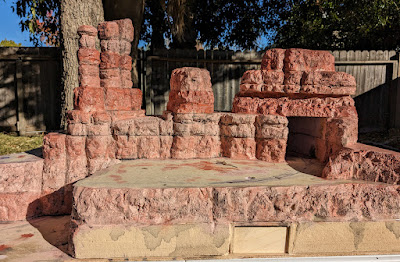
Day 2. I went back and reshaped the foam and I think it looks a lot better. Kind of Flintstones at this point, but when I paint it and add a tunnel portal and trestle, I think it will be better.
Day 3:
Did a little more carving this morning, filled some more gaps with spackle, then painted. I first put on a coat of the same tan (Behr Practical Tan) that I used for the Frazier Borate, just because I had it and wasn't going to use it for anything else. You can see some of it in the picture below. Then I went back to Home Depot for more paint.
Dave suggests using three different tints (intensities) of the same hue (base color). He buys a big can of raw sienna and mixes some of it with white to produce three different tints. I don't need a lot of paint for this small layout, so I picked one of those color cards from the paint department that gave several tints of the same red-brown hue, and had them mix sample-size jars of three of those tints: Mexican Moonlight, Sweet Peach, and Honeysweet.
Dave recommends starting with the middle tint, so I applied Sweet Peach over the tan. It seemed a little gloppy in places, so next time I'll thin it some. In this case, I hit the worst spots with a spray of water. Now it needs to dry, probably overnight, before I proceed. This color looks pretty Pepto Pink in person, though not so bad in the photo.


Comments
Post a Comment