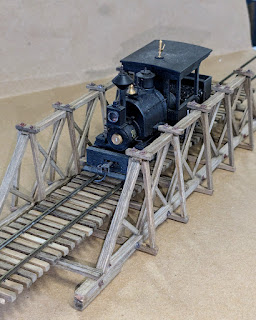
I want one of the two bridges across the canyon on my new mini layout to be a wood truss bridge; other other will be a trestle.
I've never built a wood truss bridge before, so I went looking for plans and information, and after some preliminary research, I ordered a used copy of an old Model Railroader book on Bridges and Trestles. As I hoped, it includes drawings and construction ideas for several different kinds of wood truss bridges and a wealth of information on trestles. Most of it is reprinted from old articles in Model Railroader, classic stuff from old-school masters like Jack Work and Whit Towers. I've seen a few of the articles before, but it's handy to have it all in one place.
I had in mind a Pony Truss -- a type of through truss -- and the book has two different plans. Studying the drawings, I realized that if I built them to full O scale, they'd dwarf the little engines and cars I plan to use on this layout. After mulling it over, I decided that building the bridge to H.O. dimensions would actually be about perfect for this project. Maybe not prototypically correct, but it would still look cool, be an appropriate size for the trains, and given the somewhat casual attitude of most On30 modelers toward prototype fidelity, I doubt anyone will give me a bad time about it.
As I thought about buying materials, I occurred to me that Campbell used to make just this kind of bridge in H.O.
With just a little searching I found several offered on eBay. A fellow in Santa Barbara was offering one for a very low price, so I went ahead and ordered it. It arrived in a couple of days, and after reading through the instructions and sorting the materials, I've started construction. I did order some Grandt Line nut-bolt-washer castings, since Campbell didn't include them in their kit. (For the record, they're Grandt Line #16 (2-1/2 inch nut, round washer and #80 (square washer.) I'll also need to cut some On30-size ties to replace the kit's H.O. ties.
I was very pleased with the way the Evergreen Hill water tank came out, so I'm following the same process of distressing and pre-staining and weathering the wood before assembly.
More to come.
6/26/24: I threw my back out and didn't get a lot done for a few days, but now I'm back at it and have all the lumber distressed and stained. Ready to start assembly tomorrow.
6/27/24: I started assembly this morning, and the NBW castings arrived today. Here's the first truss.
6/28/24: Lots of progress today. It just needs the floor joists, guard rails, and bottom bracing installed, a few more NBW castings, and truss rods.
 |
| The gap is pretty obvious from this angle. |
 |
| Better. Comparing this to the top picture, the stripwood here is thinner -- this is 1/8 x 1/16, and I think the stuff from the kit is 1/8 x 3/32. |
7/1/24: Done. I ended up replacing all of the side bracing.
Next, I'll build some abutments. After that, I think it's time to buy some more foam and start putting the layout together.
Much later: I've broken off one of the trusses, twice, while trying to fit the bridge to the mini layout. I'm starting to think this bridge is not a good choice to be mounted less than an inch from the edge of a portable layout.


Comments
Post a Comment