I had planned to use the Campbell Through Truss Bridge on this layout, but twice now, when I put the bridge on the layout to test fit it, I've broken it. The last time, one truss was almost completely smashed. Granted, I'm a klutz, but I'm starting to think that, as beautiful as this model is (or was) it's just too fragile to use on a portable layout, especially close to the edge. I have nightmare images of loading it in the car to take to a show and getting there with the bridge once again in pieces.
At this point I'm thinking I will probably instead use a Micro Engineering H.O. scale 50 foot steel deck girder bridge kit that I have on hand. I also have a Central Valley 72 foot through girder bridge -- almost exactly the same length as the Campbell bridge, so it could probably sit on the same piers, or at least the same footings. In my mental picture, I like the deck girder better, I think, but we'll see. Either way, I could cobble together the approaches from an ME steel trestle that I have left over from my old H.O. layout, or else use wood trestle bents. It won't look as cool, but it would be a lot more practical.
I'll eventually repair the wood truss bridge and use it on a diorama that will reside safely on a bookshelf in my home office.
This morning I stained a bunch of stripwood with Minwax Dark Walnut stain, diluted with turpentine. Tomorrow I'll add a gray wash. I did 30 feet of 1/8 inch square, which I'll cut into ties, 3/16 square for trestles, 1/16 x 1/8 for bracing, and 1/8 x 1/4 for stringers. I also did some 1/16 x 1/4 in case I decide to do a tunnel liner.
10/30/24: Here's another shot with the truss bridge in place after putting a base coat of paint on the foam. It really looks good in person (even though it's partly broken). The photos don't do it justice.
I also got a box of Campbell pine trees, and stuck one of the trunks in the hillside. The "little trains in a big landscape" thing is really going to be impressive when it all comes together.
Every time I put the bridge in place (broken though it may be) I start wavering again: The intricate wood truss just looks so striking, and I'm afraid using a steel girder bridge won't give the same effect. So today I finally broke down and ordered a Campbell H.O. deck truss bridge. From the look of it, I think this will be quite a bit sturdier than the pony truss, and it also looks like it's a little narrower so it won't come quite so close to the edge of the layout. That should be here by the weekend. It will probably take at least a couple of weeks to build.
The supporting trestles are not part of the kit, but the picture gives me a good idea of what I need to build.
10/31/24: The new bridge arrived very quickly, but unfortunately there are no instructions in the box. The seller appears to have another of the same kit in stock, so I emailed them and asked if they could open up the other kit, make a copy of the instructions, and send them to me. They said they would do that. A little annoying, but not the end of the world; honestly, I could probably figure it out without the instructions. The Model Railroader Bridges & Trestles book that I have includes drawings of a bridge of exactly this type, so it would just be a question of matching up the kit parts to the prototype drawings and figuring out a logical assembly sequence.
Meanwhile, I glued down three feet or so of ties at the tunnel end and around past where the water tank will go. I need to cut some more ties tonight, and tomorrow I'll spike down the first few feet of rail.
11/1/24: First couple feet of rail spiked down.
 |
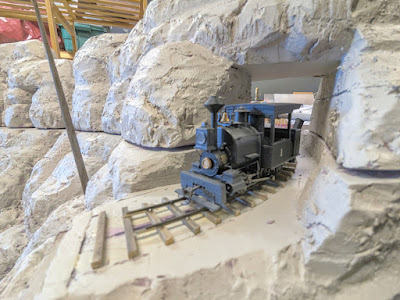
| Even though the rocks just have a primer coat, and there's no detailing, this shot starts to capture some of that "little train in a big landscape" vibe. |
I hooked up feeders and tested the DCC EX system with my DCC Porter. Seems like I need to make some small adjustments to the track, but overall, it was a very satisfactory day.
12/16/24: I took a long break from track work to build the truss bridge and do some scenery. Now I've moved on to the trestle, which I will cover in a separate post. Today I glued down the ties for the foot or so of track between the two bridges on the non-tunnel end (let's call it west, for sake of discussion).
I'm on winter break now, and I'm anxious to get the trestle built and the rest of the track laid in the next week or so.
12/18/24: I finished spiking the last bit of rail. Engine and train test run successfully. Technically, that means I met my goal of having trains running by Christmas


Comments
Post a Comment